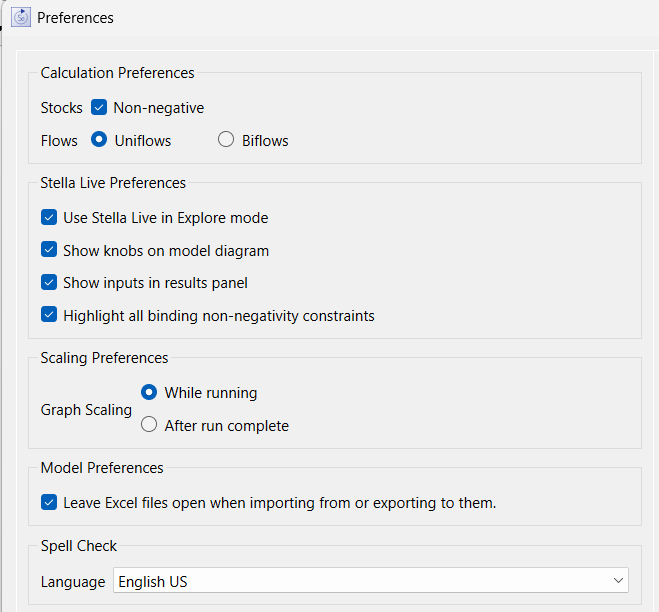
Use the Preferences dialog to set basic preferences that affect the way you interact with all models.
To open this dialog box, choose Preferences from the Edit menu (the Stella menu on Macintosh).

Use these to change the default way in which Stocks and Flows are created.
Stocks: Non-negative, if checked, will cause new stocks added to a model to have the non-negative attribute set. Non-negative stocks constrain their outflows so that they're always at least 0.
Flows: Uniflows, if selected, will cause the flow value to always be positive, even if the equation computes to a negative value. Biflows, if selected, will allow the flow value to go negative, which means that an inflow to a Stock could decrease the Stock.
Use Stella Live in Explore mode, if checked, will cause the model to be run again each time you change any value, by spinning a knob or entering it in the Parameter Control Panel . If this isn't checked, you'll need to run the model explicitly (this is useful when working with large models).
Show knobs on model diagram, if checked, will put a knob up for each model constant. These can be spun clockwise to increase, or counterclockwise to decrease, the constant's value. If this isn't checked, constants can only be changed by entering a value in the results panel.
Show inputs in results panel, if checked, will allow you to set the value of constants and graphicals in the Results Panel. If this isn't checked, you can only change constants through the knobs (and graphicals can't be temporarily changed).
Highlight all binding non-negativity constraints, If checked, will highlight any flow that is constrained because: it a uniflow with an equation that is negative; it is adjusted to keep a non-negative stock from going below 0; or an upstream conveyor is capacity constrained. If not checked, these highlights will not be made, though there is an option to turn them on for individual models on the Model Settings Properties Panel.
Graph Scaling lets you specify whether graphs should be rescaled while a model is running, or only after it's completed the run. Select While running if you want the rescaling to occur whenever the old graph bounds are exceeded during a run. Select After run complete to hold the scales unchanged. In this case, any out of range values encountered during the run won't be displayed.
Leave Excel files open when importing from or exporting to them, if checked, will always open excel files in a visible window and leave them open after reading from or writing to them. This can speed things up when there are many imports or exports as files do not need to be opened again and again. It is also much more convenient when working with files that cause Exel to display a dialog when they are opened.
Language specifies the language that will be used when checking spelling. The default is English US, and there are a small number of alternative languages available. Spell check will highlight words according to the dictionary language chosen.

These are only available for Stella Architect and iThink.
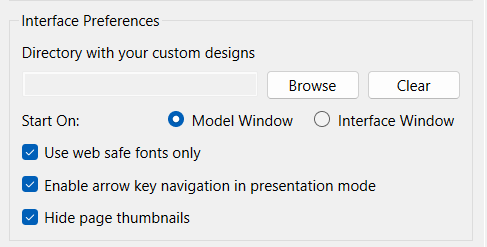
Directory with your custom designs is the location that any Custom Designs will be kept. Click on the Browse button to select a location. Changing the location will not change any files. You should select an empty folder, or a folder previously used for custom designs. When models are saved into this folder, additional files that will be used in the Design Selection Dialog are created.
Start on: lets you set which window will open when the software starts. Choose either Model or Interface. If you later open a model from the File menu, it will open in the same type of window you're currently using.
Use web safe fonts only, if checked, will limit the list of fonts selectable to those that will display well for different users with different browsers and operating systems. Checking this will provide the most consistency in the appearance of your published interface and shared models.
Enable arrow key navigation in presentation mode, if checked, will cause the up arrow to move to the previous interface page and the down arrow to move to the next interface page. All other navigation will still work as designed. This option has no effect on published interfaces.
Hide page thumbnails, if checked, will display only the page name in the Pages Panel (Interface). This is useful when working with interfaces that have many pages as it makes it easier to move between them.

This lets you set the font that will be used when editing equations. Selecting a larger monospaced font, such as Courier 12, can make reading equations somewhat easier.
Decimal Delimiter specifies the delimited that will be used when displaying values in tables, on graphs, and other input and output objects. By default this is based on your computer settings, but you can override to force a . or ,.
period . forces a . to be used as the decimal delimiter. This will make the software behave the same as it does in the US (except for import and export as noted below).
comma , forces a , to be used as the decimal delimiter. This will make the software behave the same as it does in much of Europe.
using OS ./, checks the preferences set in the computer operating system to determine whether a . or , is appropriate. This is the default.
Use ;, format [e.g. MAX(1,3;var)] in equations, if checked, will let you enter equations using European style argument lists and numbers. For example, MAX(1.0,X) would be written instead as MAX(1,0;X) with , for the decimal and ; to separate arguments. This option is available only if your computer settings have , as the decimal separator or you have selected , directly. It makes the equation (and run specs) behavior consistent with all the other controls in the software. This is consistent with Excel, but different from most scientific and programming applications, so you're allowed to choose which format you prefer to work with.
Note If you change your computer's number format preferences you will need to close and reopen Stella to have it recognize the new settings.

Is available only if your computer operating system is set to use , as the decimal separator. (Independent of the way you have set the decimal delimiter.)
Use ; to separate values (and , for decimal) as Excel does, if checked, will output csv files in the same format that Excel does. Uncheck this if you want to use exported csv files with applications that require a comma separator. This will cause csv files to be exported in the same format they would be with US locale settings.
Note During import of csv files Stella checks for the delimiter, and will automatically translate , and ; separated files regardless of your computer settings.
Note If you change your computer's number format preferences you will need to close and reopen Stella to have it recognize the new settings.

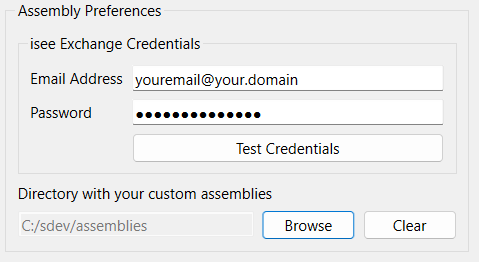
To use the Assemblies Exchange in the software you need to connect to your account on the exchange. Type in the username and password then Test Credentials. Assuming this is successful then each time you open the Assemblies Panel the isee Exchange will be queried to see if your selection of assemblies, or any of the selected components, has changed. If it has, the uploaded set of bundles from the exchange will be loaded.
Directory with your custom assemblies is the location that any Custom Assemblies will be kept. Click on the Browse button to select a location. Changing the location will not change any files. You should select an empty folder, or a folder previously used for custom assemblies. When models are saved into this folder, they will be available in the Assemblies Panel the next time you open the software.